I'm still working on my regiment of dwarf spearmen, but today, I'm posting something different. A short step by step on a commission work: a Dwarf King.
After scratching the mould lines, I have inserted and glued a pin in the minature's foot so that I can held it with a drill bit holder for painting. The miniature is then undercoated with a white spray.
 |
 |
As usual, I work zone by zone. Here, I've started with the helmet, the hammer head and the chainmail and based them with a 50/50 mix of P3 Greatcoat Grey and GW Adeptus Battlegrey. The metal is then darkened with a thinned mix of Vallejo Dark Sea Blue, Vallejo Mahogany Brown and black for the deeper shadows.
 |
 |
A mix of Greatcoat Grey and white has been used to highlight the metallic parts. The gradation is done by adding more and more white to the base, and little by little, the light becomes concentrated in chosen areas to create a shiny effect (well, that's the theory).
 |
 |
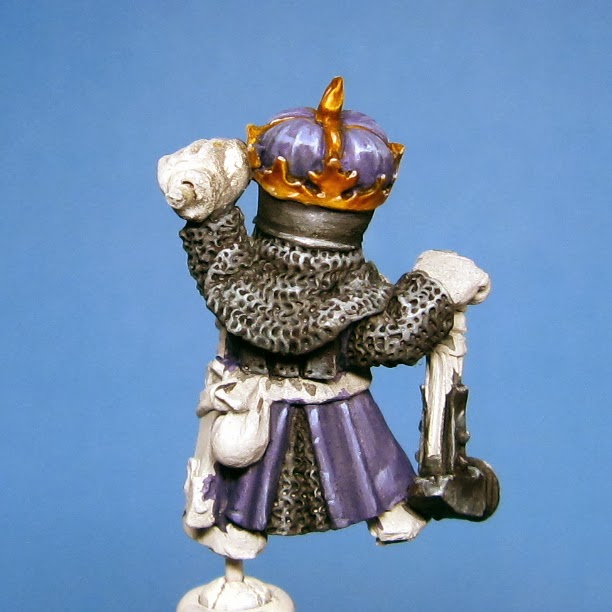
Now, the top of the helmet. The cushion is given a Vallejo Oxford Blue base, highlighted with Vallejo Sky Blue then pure white to give a shiny effect like satin. The base of the cushion is made slightly darker using a wash of Dark Sea Blue.
 |
 |
I have based the crown with P3 Menoth White Highlight, then used washes of GW Snakebite Leather and Vallejo Chestnut Ink to create more and more contrast. Finally, some touches of pure white are added to strenghten the metallic effect.
 |
 |
The robe has been painted with the same colours as for the cushion, but without the satin effect (after all, it's a Dwarf King, not an elf!).
 |
 |
All the leather elements have been processed the same way: first, a base of Vallejo Flat Brown, then shading with a mix of Flat Brown, Dark Sea Blue and Mahogany Brown and finally highlights with a mix of Flat Brown and GW Bleached Bone.
The wooden handle of the hammer has received a base of Vallejo Flat Earth, then some washes of Chestnut Ink, then a mix of Flat Earth and Bleached Bone to highlight the wood grain.
 |
 |
 |
 |
The beard gets a Flat Earth base, then washes of Chestnut Ink. The hair's Flat Earth is gradated by adding more and more Menoth White Highlight.
And as you can see on the last picture, I've reworked the helmet with some golden NMM.
 |
 |
 |
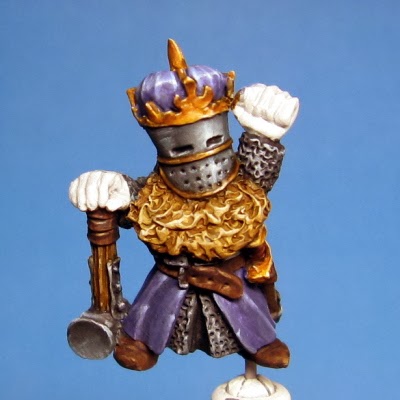 |
The flesh is given a GW Dwarf Flesh + GW Elf Flesh base. It is made slightly darker using an old Citadel Flesh Ink, then two colours from the Andrea Flesh Paint Set and finally, a very thin wash of Chestnut Ink. Pure Dwarf flesh is used to smoothen and correctly define the skin's shadows. The highlights are completed with Elf Flesh and Bleached Bone.
 |
 |
 |
 |
Next week, I'll try to give him a shield and a base ;-)
Merci pour le tuto photos, ton NMM est vraiment formidable.
ReplyDeleteSouvent je peints intentionnellement des faux reflets, des impossibilités d'éclat de lumière de peur de ne pas réussir à mettre en valeur certaines parties métallique, en général à l'opposé de la source de lumière ...
Et je dois bien avouer que l'efficacité de ta technique me coupe le souffle. Pas forcément sur cette figurine, je parle en général sur ce que tu nous présentes.
A++ Nico
Brilliant! Thanks for posting this up with great photos...of one of my favorite figures!
ReplyDeleteMerci!
Amazing! You make it look so simple...
ReplyDeleteReminds me of the old step by step painting guide in WFB 3rd ed on how to paint an orc.......except yours look ace!
ReplyDeleteThanks for the tutorial :)
Thanks, I'm glad you appreciate the tutorial.
ReplyDeleteAmazing :) and what a nice step-by-step guide. It's always nice to see/read how others work and learn from it.
ReplyDeletethat's a great step by step you've provided us with, will have to try that out sometime.
ReplyDeleteTop Brightening Face Wash has a refreshing fragrance and leaves my face feeling soft and glowing after every wash.
ReplyDeleteTop Brightening Face Wash